If your moving to Blender from Maya or 3ds Max or any other software, one of the biggest challenges you will face is shortcuts!
and the first thing you will do is try to change Blender Keymap to match the shortcuts of the software you switching from because you are so used to it and it’s very comfortable.
My advice to you is DON’T DO THAT!
Discover these Amazing Blender Addons!
Switching to Blender from another software
I know it’s convenient and in your mind, it’s the shortest path to switch to Blender but the reality is you are just skipping an essential part of learning Blender.
Learning new software is challenging even if your switch from one software to another and the struggle you face with new software is similar to when you move from one apartment to another or from one job to another, at first it’s uncomfortable and hard but it gets easier with time.
The more you stay attached to your old house and old job the harder the new ones and getting accustomed to the new situation will become, but if you accept the new situation and take it head on and acknowledge that it will take time and it’s okay the faster you will feel better and get better.
Blender Essential Shortcuts
| Shortcut | Description |
| Space | Search (very useful to get to commands you want) |
| Shift+D | Duplicate |
| Ctrl+Alt+Q | Quad View (Space in Maya ) |
| Shift+A | Add Menu (to add all kinds of elements) |
| Shift+S | Cursor Menu |
| . | Pivot Menu |
| y | Shading Menu |
| TAB | switch between Edit mode and object mode |
| 1,2,3 | switch to vertex, edge, face mode (you have to be in edit mode) |
| A | Select all |
| L | Select linked (in edit mode, hover over one part of your mesh and click L and it will select all the polygons of that mesh) |
| h | Hide |
| Alt+h | Unhide |
| Shift+h | Hide All Except Selected |
| g+g | Slide edge |
| Ctrl+ or – | grow and shrink select (- + one the numpad) |
| Q | Quick favorite menu (very useful starting out, to add to the menu right click on anything and click “add to quick favorites”) |
| Alt+Z | Xray mode (very important because selecting vertices or edges or faces and you want to select the back elements you have to be in Xray or wireframe mode) |
| X | Delete Menu |
| E | Extrude |
| I | Inset |
| K | Knife |
| J | Connect 2 Vertices |
| Ctrl+R | Insert Loop |
| O | Proportional Editing (soft selection in Maya, Scroll wheel to grow or shrink its size) |
| u | UV Map Menu |
| f12 | Render |
| f | Brush size (Sculpting) |
| Shift+F | Brush Intensity (Sculpting) |
| Shift | Smooth (Sculpting) |
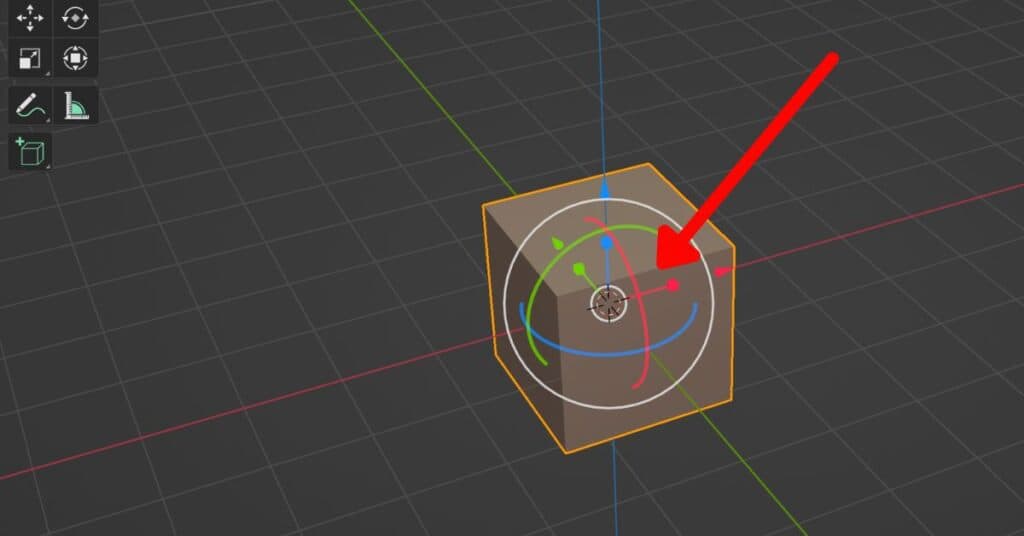
Move, Rotate, and Scale Gizmo in Blender
one of the struggles I had in Blender is move, rotate and scale, coming from Maya it was very easy by just using shortcuts but in Blender ohhh its a challenge.
Get started with Blender today with this easy to follow Course – Link Here
There is the G for move and R for rotate and S for scale, yes BUT there is no Gizmo involved! you don’t see any axis to click and control.
Now after a while, I realized that there is a way to activate those Gizmos on Select of any object, it’s not ideal but it’s a very good midground.
Here is how you activate it:
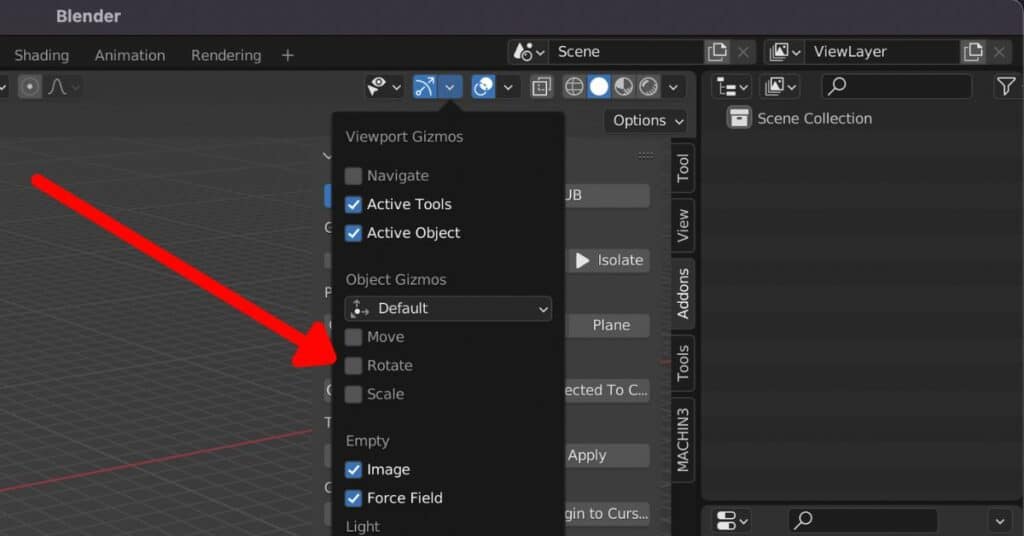
Activate all 3, Move and Rotate and Scale, this way whenever you click on an object you will get a Gizmo like the one below automatically.
Interested in 3D artist jobs? Browse the latest openings at artblast.co/3d-artist-jobs.
Looking for a game art job? ArtBlast curates 10-60+ game art jobs daily. Subscribe at artblast.co/subscribe and apply while the role is still fresh.